I’ve been waiting to write about my project “Carputer”, for a long time. I tried to share all details step by step from the first stages of this long-term project till completion. You can check my previous articles that I have written as a preparation to this project.
- Get the Source and Display your Favorite Youtube Videos using C#.Net
- To Control your mobile phone by AT Commands via Bluetooth (C#.NET)
- Get OBD2 Data via ELM327 C#.NET
- To Connect to your iPhone via Veency
UPDATE: You can check it out my latest project, fitting iPad mini in car here if you’d like: iPad Mini in CAR explained
The Carputer project first started in 2009. My first goal was to provide a 7-inch touch screen, mount it in-dash on my vehicle, and connect an old laptop to this display to allow use of computer in car.
For this purpose, I first searched for touch enabled displays on the internet. I found the CarTFT store and chose the CTF700-SH model from many options. This is a 7-inch LCD display with a strong backlight to prevent glare under the sun and a special anti-glare coating. The native screen resolution is 800×480, which is also used smoothly with the interpolated resolution at 800×600. If you so desire, the product is also supported with 800×480 intel drives. In this way, although Windows does not support the standard with a modified driver, you can use your computer at 800×480 resolution. But this is not handy at all in low resolution windows. By the way, the time is not too old, but the fact that a 7-inch screen has a resolution of 800×480 was not a bad resolution for in 2010 🙂
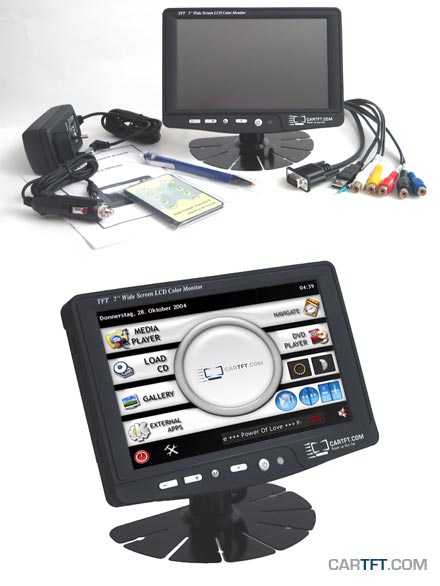
CTF700_SH used for my carputer
You always need a simple user interface to use in car for security concerns. There are many applications developed for this purpose, paid or free. My first application was the interface you see in the photo above. This interface is a freely distributed by CarTFT. It offers a simple interface and was easy to use.
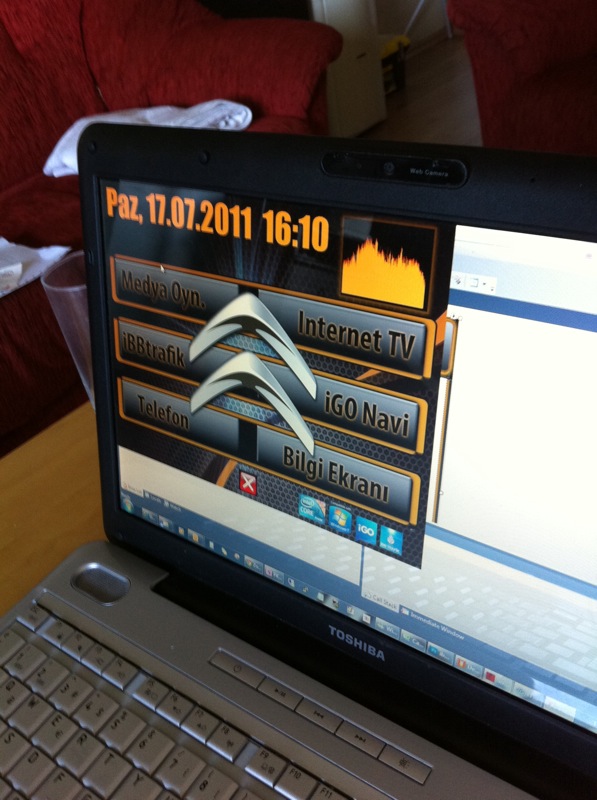
After I use some of these apps, I thought that I should develop on my own. I developed 3-4 different applications with C # .NET for 3 years.
I share 3 screenshots from old to new:

Carputer prototype from Doğuş University Projector ’11 Technical Project Competition
The image below was after I realized that I had to take application away from the Windows standard controls and make my own design in Photoshop. The basic application features and ‘code behind’ remained mostly the same.
Let me talk about the features and how I implement them to to my app:
- Media Player: I used the ‘Windows Media Player’ API in back-end. In order to keep it simple to use, it starts playing the music & video file you have selected from the files and folders, by automatically creating a virtual playlist in all the other files in that folder and continuing to play it automatically. The small screen used for visual effects is also used as a video viewer, double-click full screen and so on.
- Internet TV: It connects to Digiturk Play (Turkish service provider) using WebView components in a very primitive way and allows users to watch TV channels after verification. The method is primitive, but all user input and channel selection is automated in the back-end.
- ibbTrafik: Residents in Istanbul know the importance of monitoring the traffic situation while driving. This application also set out for this purpose. ibbTrafik automatically connects to the government website and offers a modified frontend. Of course, these are happening in the background again. You only navigate the map with your finger on the map and get the traffic information you need.
- iGO Navi: I’m using the PC version of iGO. There’s nothing I’ve done so much in this part. I only make the application to run programmatically and disable the ‘always on top’ feature of my front-end application.
- Mobile Phone: The phone part is a little enigma. When I first started the project I was using the Nokia N97. Since the device supports AT commands, I could connect to the device via bluetooth and control the phone features. Check out : To Control your mobile phone by AT Commands via Bluetooth (C#.NET)
Then I started using an iphone and learned that I could not manage an iphone with AT commands. I even learned that I can’t manage in any way. Since I don’t have the knowledge to implement the HFP protocol via Bluetooth, I tried to jailbreak my phone and connect with VNC with the application called Veency. Check out: To Connect to your iPhone via Veency
Then I thought I had to solve this job without jailbreak and went to the ‘Bluesoleil’ solutions. Bluesoleil’s own bluetooth APIs allow you to easily define HFP to a PC. Check out: BlueSoleil 10 - Information Screen: It is the screen which I receive data from the vehicle via OBD-2. I take data such as speed, rpm, engine temperature, engine load and is presented as visual data. Speed-time graph, acceleration, gear (my vehicle is a manual gearbox, gear information to show the current engine speed of the vehicle by dividing the speed ratio of the gear.) I get data from the above raw data. In the same way, I automatically connect to a USB GPS and get real-time address data from the Google Map API. I get the battery voltage from ELM327. So, even when the computer continues to operate when I turn off the ignition, the computer automatically shuts down when the battery voltage becomes critical.
This screenshot from a theme design that I created for Centrafuse ;

While I was doing search for alternative UIs for my carputer, I saw a car pc user interface application called Centrafuse. The advantage of the application is that it provides you the ability to develop plug-ins and themes using its API and SDKs. So I found this application is worth looking at and installed. I’ve used Centrafuse for about 3-4 months, Since I can connect to the vehicle via CAN-BUS and receive vehicle-specific data, I was doing a plug-in and theme work that could include them in Centrafuse.
I explained all staff about software. Let me start explain how I fit it.
2007 Citroen C4 out of the box dashboard:

The picture below shows the cars that coming with navigation as factory default. In Turkey there was no such option at that times. So even I could not find any after market 2-din mount kit.

Inspiring from the dashboard in the first picture, I cut the familiar dashboard to be able to be fit to my 7-inch monitor in-dash like shown in picture below.


I know the above image doesn’t look good. The above part was sanded from thick to thin. Then cut the plastic parts from the shampoo bottle glued to full the gaps from left and right side. Then the gaps were filled with putty and sanding started. This putty + sanding cycle took for 2-3 days .

After putty I used opaque black paint:

The problem after mounting display is computer unit. When I realised that this not gonna work with laptop, I decided to put a mini-atx motherboard in glow box as hearth of my carputer. I bought a video and audio onboard motherboard from Asus with DDR3 Ram and USB 3.0 support. Intel i3 is used as processor, a 60 GB SSD and an OCZ brand hard drive. The mechanical disk was nightmare because of vibrations. SSD’s boot time is another advantage.

The image above is still not good, but all good when you close the glow box. Glow box has air conditioning, so very good choice.
In the meantime, the socket at the bottom left of the touch screen above is the connection socket of our tiny trip computer display. Both power and data communication is provided on this line. Three years ago, I thought that this type of data communication was VAN (Vehicle Area Network), and I made a research about it and shared the data I received with an article I wrote on the blog. I thought the data analysis I did with the oscilloscope misled me and bought a Protocol Analyzer that can be connected to a computer via USB.
I bought a cheap protocol analyser to connect to PC: http://r.ebay.com/4bgJNr
After I realised the protocol is CANBUS, I got progress on deciding data form car. At the moment, almost I can decode most of the data coming from comfort bus of my car.

I think the reverse engineering that I applied in CAN-BUS should be subject of an article itself. Because there is no public document about this data. I also contacted with Citroen, they suggested me to contact with couple of companies in France for test equipments, sales and training. Since we do not have commercial purposes for the time being, they do not share details about CAN-BUS node IDs and values .. so I continue with Reverse Engineering.
Decoding without any document is challenging. I collected gigabytes of data for each scenario (ignition on, radio on, etc.). So I exported all data to MySQL server for better analysis of data. I tried to figure out bit changes on data by selecting distinct data from database. It took almost 2 months, approximately 30 mins in garage, 2 hours by doing data analysis a day.

Citroen C4 Radio AUX
I don’t use an after market radio. By default there is no aux output in radio. There is a special pin at the rear side of the radio but it should be enabled via software.
I use 3 pins from rear side of the radio (Right+, Left+, common).

Other side of this cable is standard 3.5mm stereo jack. In E-Bay there are ready to plug cables can be found. I have been using my own for 3 years.
Power Supply for Carputer
Another issue is to provide power to motherboard. I used a DC-DC converter. A power card called the M4-ATX.

This small card you see above not only provide power for my carputer, also powers on the carputer automatically when You switched ignition on. The carputer is powered off by sending hibernate & shutdown & sleep command to the operating system when you switched ignition off. When the battery voltage becomes critical, it can automatically cut off the power. There are many more functional features.
Click here to download the data sheet of the device.
What I have in my glow box: Asus Mini-ATX Motherboard + M4-ATX DC-DC Power supply + SSD Disk
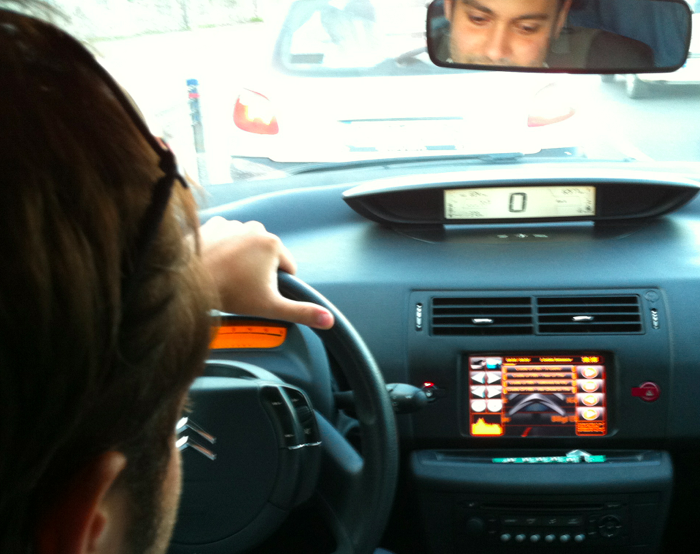
Result:

Carputer in Citroen C4
You can reach out to my next project after Carputer below;
Leave a Reply